A group project by Anna Palmer, Mady Chase, Hanne Deener, Nicole Bell
Learning Goal: Our goal is to discover the best resources to support our learners through the use of differentiated technology with a focus on open and distributed learning.
In each post, we plan to include an overview of what each resource is and why it is useful or helpful to our future careers and experiences. We will be adding the relation to our learning goal and delve into the drawbacks or limitations, if any. There will also be a section about where the resources are utilized or available and our own experiences using the resources!
Week 1:
Came up with the topic
Blog post #1 – Augmentative and alternative communication
Week 2:
Blog post #2 – Open Online Resources
Blog post #3 – Khan Academy
Week 3:
Blog post #4 – Text-to-speech
Blog post #5 – Summary
Stay tuned for more updates on our learning/project plan journey!
A project by Anna Palmer, Mady Chase, Nicole Bell, Hanne Deener, Finlay Jessop
Overview
As identified in the article, Why Literary Devices Matter by Lorraine K.C. Yeung, the impact of literary devices in fiction and poetry plays a crucial role in evoking emotions among readers and writers. According to Yeung, the purpose of literary devices is to contribute to the emotional depth of a piece and grasp readers’ attention “in a way that prompts their emotional engagement even before any meaningful content for cognitive judgments is available to them” (p. 35). Similar to Yeung’s analysis of literary devices and looking into how literary devices are important in poetry, Joan Peskin from the University of Toronto talks in her article, The Development of Poetic Literacy During the School Years about the impact these devices have on poetry. For example, she states how “… poetic interpretation is driven by the intrinsic textual features of a poem. There is now evidence that poetic processing is both reader-driven and text-driven (p. 77).” Therefore, to fully grasp the importance of literary devices in poetry and other writing, we need to be learning and teaching this topic in a variety of ways, such as auditory or visually.
One of the most common misconceptions about poetry is that it is boring. One of the biggest reasons for this is that, specifically with young students, it is thought that all poetry must rhyme, which they may find uninteresting or juvenile. Another misconception in relation to poetic devices is that they don’t actually hold a purpose within the poem. Students think that devices are unnecessary and just for show; however, they don’t realize that the devices are often what gives the poem a deeper meaning and a more impactful effect.
This topic is of particular interest to us because all of us are hoping to be elementary or middle school educators. This is a resource that would be useful to elementary school teachers who are introducing poetry to their students, and show them that poetry can be interesting and fun.
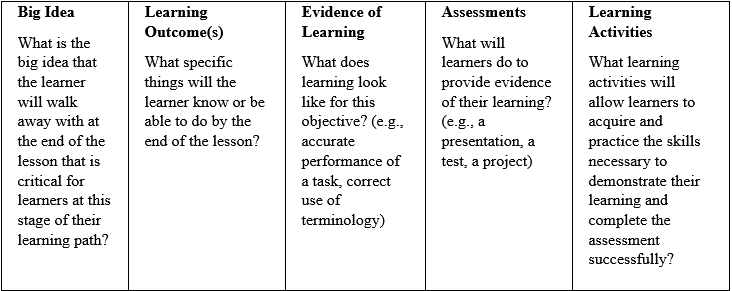
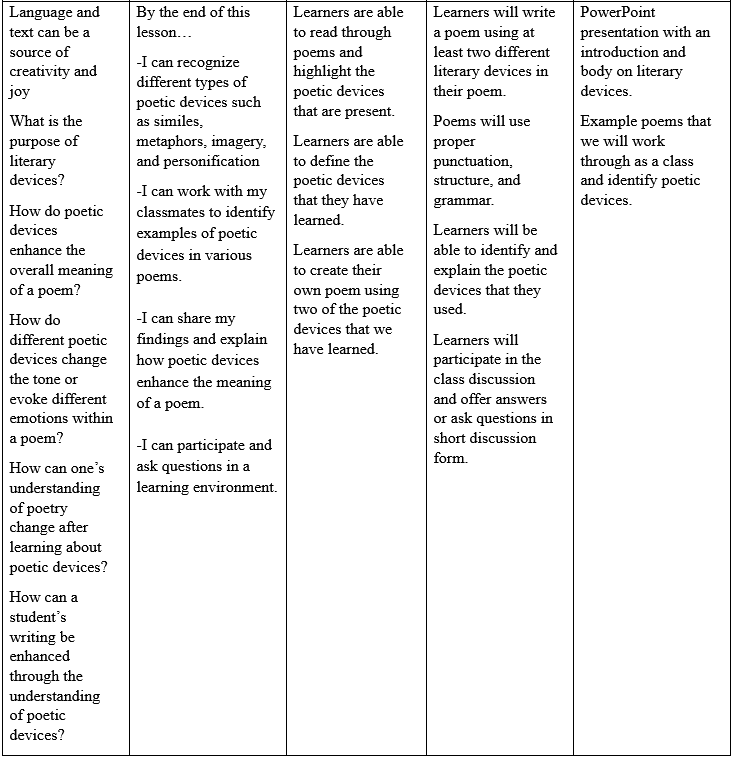
Lesson Design Planning Template
Resources
PowerPoint presentation
Example poems
Writing materials or personal computers
Paper or journals
Roles and Responsibilities
Mady: One misconception (Poetry is boring) in the Overview, Learning Outcomes portion of the Lesson Design Planning Template Anna: Connection to common practice in our field in the Overview, Big Ideas portion of the Lesson Design Planning Template Nicole: One misconception (that poetic devices in literacy don’t hold a purpose) in the Overview, Evidence of Learning of the Lesson Design Planning Template Hanne: One academic resource (Why Literary Devices Matter) in the Overview, Assessment portion of the Lesson Design Planning Template Finlay: One academic resource (The Development of Poetic Literacy During the School Years) in the Overview, the learning activities portion of the Lesson Design Planning Template
After reviewing the reading materials for this blog prompt, I kept feeling the curious question rising of:
"what is the digital and carbon footprint of artificial intelligence use and of more powerful technology now?"
When delving into Neil Selwyn’s 2021 article Facing up to the Dilemma of Sustainable Digital Futures, I found his exploration of the environmental impacts of digital technologies correlates to the unsustainable carbon footprint with the increase of human reliance. From manufacturing to data storage, Selwyn details how the “disposal of e-waste is another major environmental burden” and one that compiles on the existing burdens of AI usage.
He states strongly how we, as a society and individual people, cannot continue to consume digital technology at current rates due to the foreseen and unforeseen detrimental consequences. AI is so early on in the mass production and availability for general use now that we cannot determine the exact impacts it is making -and will continue to make- on the environment… but we can safely predict that it’s not feasible.
Another important point that Selwyn discussed in his article is the human reliance on AI and digital access now. It is inextricably not slowing down and while the technological advances are revolutionary in theory, the practices could be the eventual determining factor of our downfall. Not to give way to the concern of AI taking over, but with regard to the environmental impacts and carbon footprint, AI may take over as one of the largest mass waste producers.
My problem is how many different sources share conflicting results and opinions. I can’t decipher, as I have not conducted any studies myself, what information is reliable. Social media platforms tend to lean towards hyperbolic claims of the damage that AI use leads to while an instructor for another course at UVic requires AI usage as part of their curriculum. The information I am receiving is inconsistent and it’s hard to believe either side.
For example, in this article, Using ChatGPT is not bad for the environment by Andy Masley (2025), he argues strongly how many everyday activities like using a computer or running the vacuum cleaner use much more energy than using an AI software like ChatGPT. While reading through the article, the researcher does seem well-informed and uses many heavily-researched examples, however I do find the tone of the paper to be so assertive that I almost mistook it for satire initially. I also want to point out that the website Masley’s article is published on is a self-publishing site. This means that it may not go through a reviewing process by an external body. These kinds of things are important to note to determine the motivations and credibility behind published materials.
Alternatively, this journal article by Kate Saenjo and The Conversation US titled, A Computer Scientist Breaks Down Generative AI’s Hefty Carbon Footprint (2023) in Scientific American, tends to gravitate towards the other side of the AI use spectrum and argues that the usage of water and energy specifically is actually incredibly harmful towards the environment. Saenjo compares the creation of an AI model called BERT consumed the equivalent energy to a “round-trip transcontinental flight for one person.” Granted, this is measured for the full creation of this particular model. Saenjo goes on to present other comparisons in energy usage and determines that all of it (AI creation, maintenance, and usage) is more impactful to environmental damages than our planet can sustain.
The image above is how I’m feeling about the argument. Ultimately, as an advocate for environmental protection measures, I tend to lean towards the presumption that the damages to the environment will lead to some catastrophic outcomes. At the very least, we know, as pointed out by Selwyn (2021), that the environmental impacts are unsustainable without the adoption of climate-friendly digital practices.
After reading about the theories of constructivism, cognitivism, and behaviourism in the article, Behaviorism, Cognitivism, Constructivism: Comparing Critical Features From an Instructional Design Perspective by P.A. Ertmer and T. Newby, I reflected upon my own learning style and couldn’t quite place myself into one specific area. I wondered if there was an overarching learning style where each of the specified categories would blend or overlap, considering the complex nature of the human experience and especially that tied to learning. Perhaps each theoretical practice emerges individually or simultaneously during a single learning moment. I wondered if the most prominent emergence would then be considered the theory dominant, specific to that moment and learner response.
My initial thought was that I align with constructivism more than cognitivism and behaviourism because I can be self-motivated and direct some of my own learning, but I have to wonder if each of these styles emerge continually throughout the process of learning. For example with behaviourism, I do tend to thrive when I have external stimuli motivating me like the act of keeping in pace with my peers. This means that I am motivated externally at times, even when none of my peers are establishing an expectation to perform to their level or above. It makes me wonder, again, if that is constructivismn at play as the motivation stems from my own drive towards achieving a non-existing expectation…
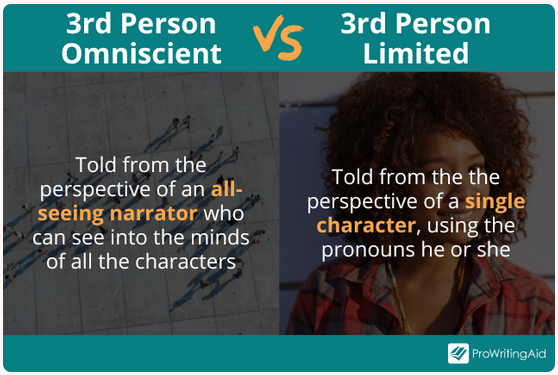
A example of my learning experience is a recent one while working on my car with my mechanic, or my vehicular guru, as I like to call him, who has been teaching me throughout my vehicle journey with my recent dream car acquisition. I have learned how to navigate the regular maintenance and then some. As I am becoming a teacher myself, I seem to have developed meta-observational skills -a term I made up- where I can identify the techniques or styles emerging from a teacher while I am in the state of learning. It really is a bizarre space to occupy as I feel both present in a first-person point of view and omniscient (only specific to my experience, therefore closer to a third-person point of view) when the meta-observational skills kick in.
To link this back to learning, motivation, and theory, I have to wonder how the skills of recognizing the learning theories helps or hinders my experience. Does being this aware actually advance my learning or could the experience be stunting my experiential learning by taking me out of the moment. Could these meta-observational skills foster support for students as it does for teachers? Perhaps the line between student and teacher could become blurred and would that be the worst thing? After all, who is teaching whom?
While reading the paper, Openness and Praxis: Exploring the Use of Open Educational Practices in Higher Education by Catherine Cronin, I considered the ramifications of how Open Resources would affect students in post-secondary institutes and how the educators would utilize the materials. From first-hand experiences, I know how expensive textbooks and resources can be and how that impacts students’ already limited budgets. For the educators, assigning a costly resource must be made worthwhile with expected readings, but I feel an amount of skepticism when the required texts are written in part, or wholly, by the instructor at hand. It reflects a conflict of interest, as I see it, and I have heard it described it as “profi-teaching:” a blend of ‘profiting’ and ‘teaching.’
On the other hand, I can see how a teacher could advance in their own study and profession to the point of writing all components for their class, but then I wonder how much of it is in alignment with the educational expectations set out by the post-secondary institution or if it more closely favours their own agenda. Regardless, a little part of me always pauses for contemplation when learning that a required text has a direct endorsement to the instructor’s wallet.
Free Resources?!
Back to the article. While reading Cronin’s work, I was drawn in about the educational resources being freely available at hand and online with absolutely no cost to the user!
Except… are they entirely free?
I chose to explore the ‘open as free’ concept further because I was intrigued upon reading how “[in some] cases, while resources are technically free, they have an opportunity cost to the user in the form of personal data and usage data” (Hodgkinson-Williams & Gray, 2009). I know only a fraction of the impact of personal data collection and usage, but I do know that it can be taken and stored, then sold to companies to use for various reasons including tailored marketing. What this means is that data can be sold without the explicit consent from the user, which could be deemed unethical as it can raise concerns involving privacy.
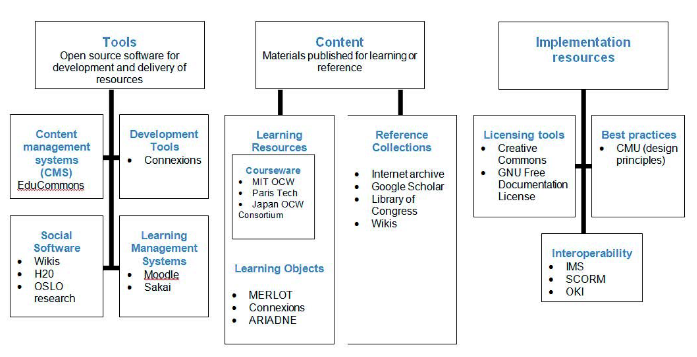
The article examines the various means for Open Educational Resources (OERs). Within the article, I found this conceptual map of the OERs helpful to for the comprehension and categorization for the broad term ‘content:’
Perhaps you too will recognize some services included in the map, as I noticed Wikis, Moodle, MIT OCW (after reading this article about it), Internet Archive, Google Scholar, and Creative Commons. It appears more clear to me to view it laid out in a visual format how the categories are organized and what resources reflect their purpose on the internet.
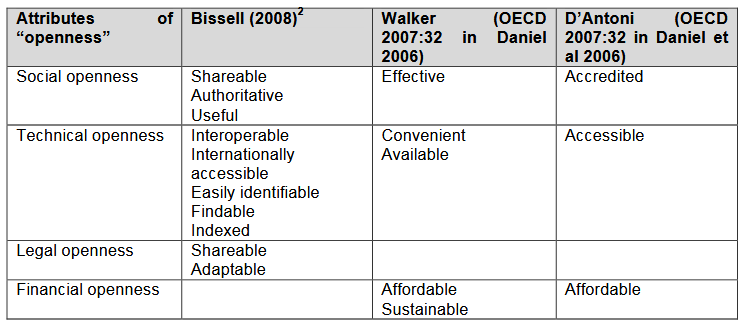
While the term can be rather vague and defined individually by separate educators and institutions, below is a table from the same article by Hodgkinson-Williams & Gray (2009) that lays out the attributes of ‘openness’ from several perspectives:
I do suggest reading through the article to gain a better understanding for yourself. I recognize that I’ve only scratched the surface for OERs and have more to learn. If interested, please take a look at this short video below to gain a better understanding.
My name is Hanne and I am in school to become an elementary school teacher! I am going into my third year of the BEd program through UVic. I was an Education Assistant previously and have worked with children since I was about ten years old. I currently work as a nanny, as a tutor, and as a Community Support Worker with people in the disability community.
I have many hobbies and work several jobs, which keep me busy and my life fairly full. With two family dogs and a love for the outdoors, I like to keep active on hikes, swimming, cycling, and general walks. I also love gardening, organizing, making candles and bath bombs, and going to the beach!
These are my dogs: Juno (left) and Riley (right)
I am interested in the Information Communication Technology certificate courses to help integrate more technology into my teaching practices to encompass Universal Design for learning aspects and accessibility implementation. Additionally, the ICT certificate counts towards upgrading professionally to teaching category 5 with the Teacher Qualification Services.
My experience has been one technology course as part of my BEd required courses and that is all, so I am very excited to learn more and pull out some useful strategies and aspects to include in my own practice as a teacher!
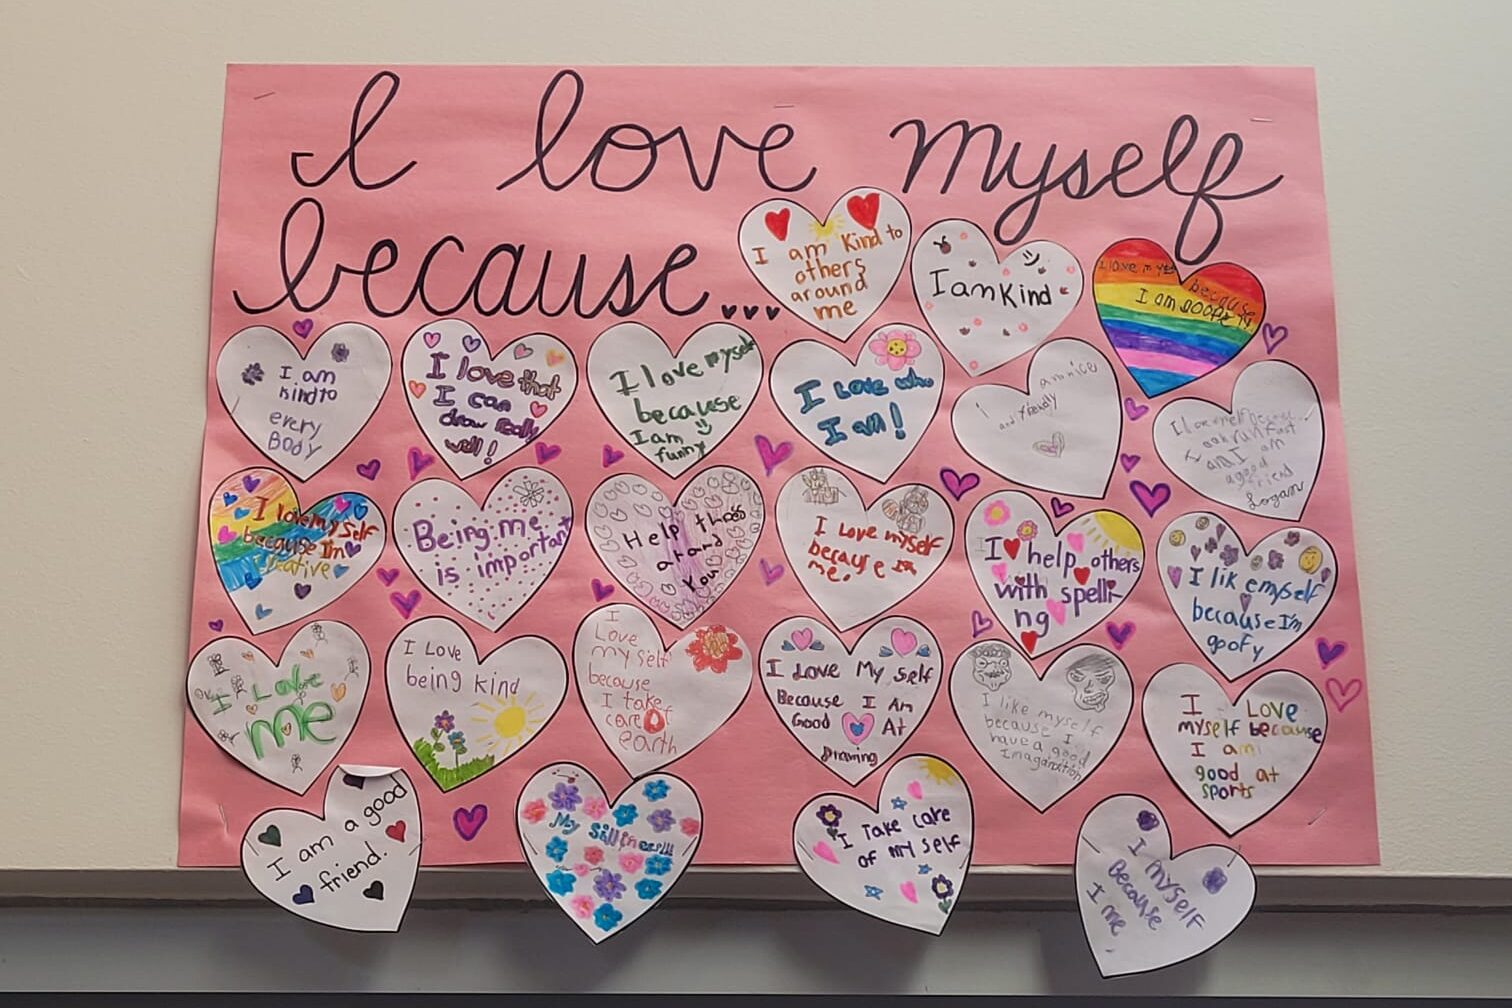
A poster I made with the kids on my final day of practicum
Thank you for learning a bit more about me! Please leave a comment about anything you relate to or any questions you may have about my learning journey and experience. 🙂
While watching and listening to the YouTube video, I was in the shower and let the reflective thoughts from Jon Dron flow while I pondered. I usually do my best thinking in the shower, which can be hard when I don’t have a pad and paper to write down what made sense; but writing it into my waterproof phone does allow me to document my reflection.
Among many intriguing points of conversation, Dr. Dron expressed something that piqued my interest: when you increase extrinsic reward, you decrease intrinsic reward. I hadn’t considered the ramifications of extrinsic motivation and the actions of encouraging such. From my new understanding, it can actually draw the effectiveness away from feeling internal accomplishments and I know that the latter is a better determinant of long-term resilience and success, as detailed in a study conduced in the Journal of Informatics Education and Research. What I have to gain from this learning is the process of teaching -or more so encouraging the exploration of- self discipline and discovery of intrinsic motivators. But, how do I teach this is if I’m extrinsically motivated myself? Is it a fault to teach something you have yet to discover? There exist marriage counsellors who are divorced and counsellors who are still unpacking their own traumas… maybe the flawed existence and continual strive for improvement is only human. I have more to learn and explore on this topic.
Back to Jon Dron’s conversational exchange. He spoke about students’ specific experiences with distanced and alternative learning. For example, portfolios are opportunities that allow students to choose their best work to be submitted for review from the teacher. Conducting a pedagogical approach such as this allows more autonomy over students’ learning assessment and encourages growth. This, paired with formal assessments in the manner of tests helps, students assess their own levels and be responsible for their education, productivity, and effort as they are able to continually progress and reflect.
The second speaker with Dr. Dron isolates the theory that to make a big change in learning we must de-couple assessment and learning. This is hard, as I consider how deeply ingrained assessment is in institutions. I need to think about this more deeply as I haven’t heard this directly from an academic. I have felt similarly for a while, especially when studying for a big exam, but I have to keep wondering how education can progress with this while so much of it is standardized to push students through a system that has been breaking down for a long time now. If anyone would want to argue the latter sentence, I would encourage some reading on the decline of literacy rates in Canada and the skill levels that seldom correspond to the grade level. This has been my own observation and research.
There are many aspects of this conversation that I have to consider further and would appreciate having some exchanges to flush out the ideas more for my own comprehension and consideration. It appears I have a lot to learn… and to unlearn.
References: Role of Intrinsic and Extrinsic Rewards in Motivating Employees. (2024). Journal of Informatics Education and Research. https://doi.org/10.52783/jier.v4i2.1185
There have been many ups and downs with this inquiry project, namely the premonition that my stereo upgrade was undoubtedly going to happen. I felt disappointed, to say the least, when I learned that the budget I had originally started with was well below the anticipated costs.
Lets take a look at the things I learned along the way:
Leave it up to AI: I asked Copilot and ChatGPT to give me a full stereo setup for under $1000 (my budget) and they delivered. However, what I didn’t consider was all the other parts and tools that I would need to replace or remove any of the existing equipment in my vehicle, which ran the cost way up
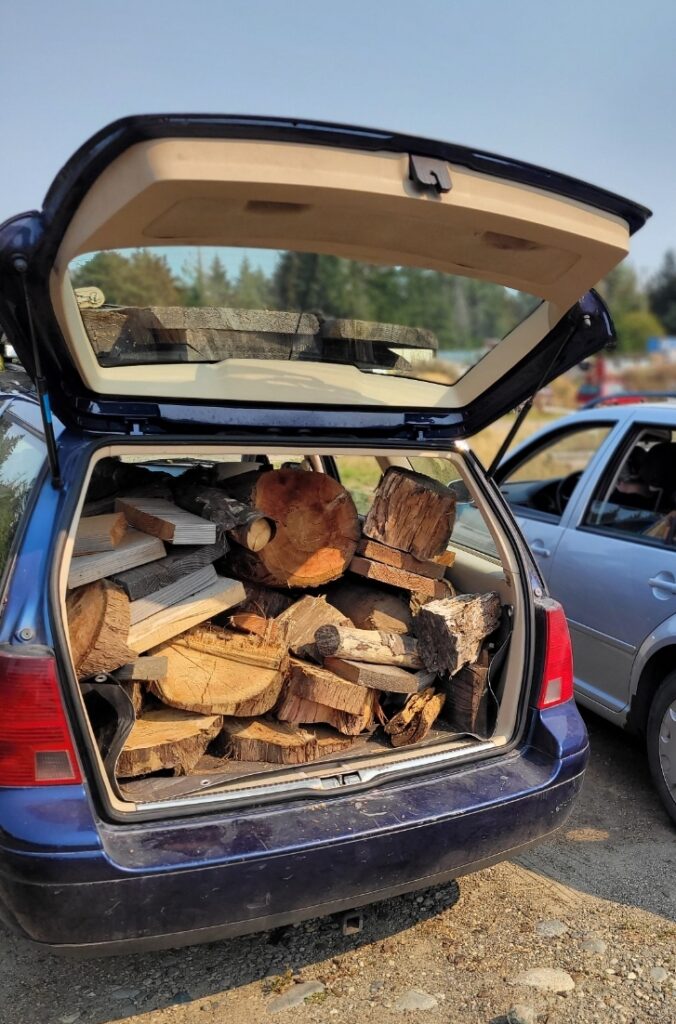
Space for Subs: I learned that my vehicle has a neat area in the trunk/wagon that could be used for the storing of the amplifier and sub-woofer so I don’t lose cargo space
Under-seat Storage: If I bought the *mildly expensive* sub-and-amp in one combo, I could get a small enough one to fit snugly beneath the driver’s seat which would also reduce the possibility of new equipment taking up too much space
Stereo Found: During my hours of extensive research, I was able to find the exact digital media receiver I want to install and a video showing me how to do it. When the time is right, and gold coins rain down from the heavens into my pockets, I will know what I want and how to install it
Financial Frustration: After weeks of research and countless hours watching videos, reading forums, and adding more items to carts, my dream of upgrading my stereo system in my car has come to a pause. I know it won’t stay paused forever, but for now my financial focus has to be on school, rent, and bills. There will be a time, but that time is not now
In summation, I still dearly love my vehicle. Crackly speakers and all. It is my dream car and I am more than grateful that I hanifested it into my life this year. That has been my true dream come true. It continues to serve me very well and I hope to upgrade it’s stereo system one day. Now, at least I know how.
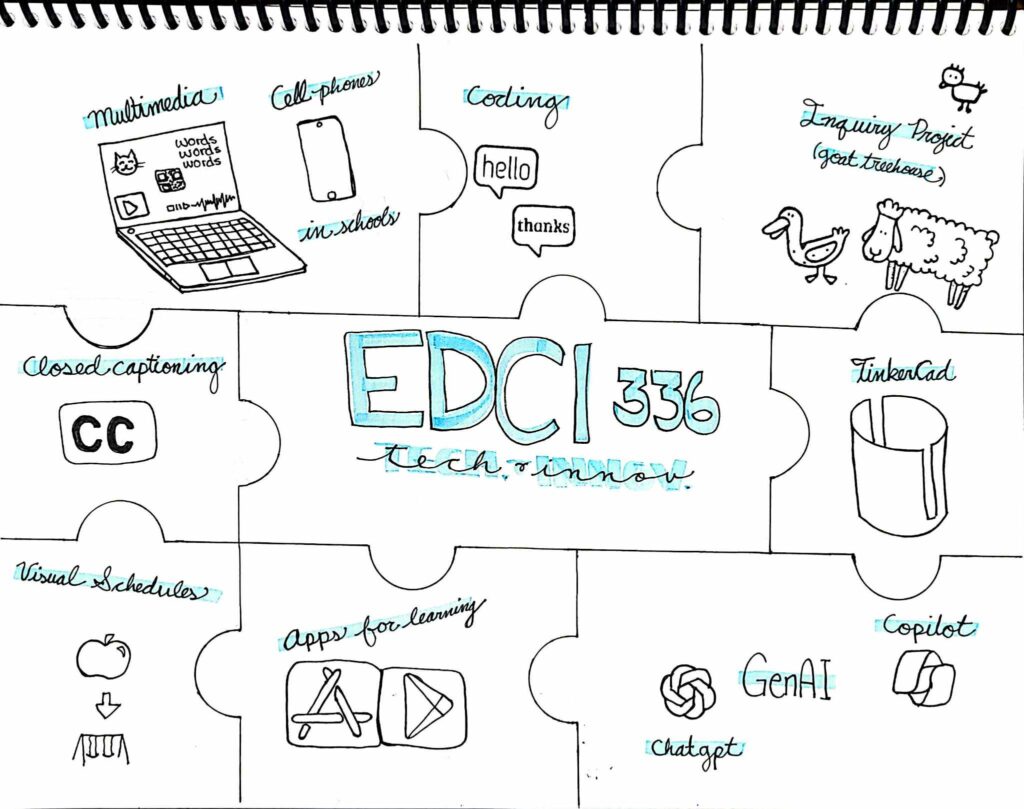
Here is a Sketchnote of (almost) all the things I learned in Education Technology and Innovation 336 over this semester
Multimedia Approach: This can help create an encompassing approach to presenting information with video, audio, QR codes, script, images, and interaction within presentations
Cell Phones in Schools: My group’s Technology Presentation was on Cell Phones in School and the ramifications of the recently established ban in BC on cell phone use in schools. This topic was illuminating and brings forth such an interesting perspective of how demanding cell phones can be on our focus and time
Coding: I no longer fear coding! It always seemed like a big, scary idea that only students who go through a computer science degree can understand and tackle, but a very light version of coding was introduced in this course and now it doesn’t seem so bad. It’s sort of like a puzzle, and that’s how I’ll present it to my future students too
Inquiry Projects: While my inquiry project didn’t turn out the way I was expecting, inquiry projects in essence follow the student’s curiosity and allow them to bring that into their education. My project was wildly different from any one other students, yet we were all able to progress and learn more about something we had an interest in. Encouraging students to explore their passions helps motivate them to further their education on it and they can learn a lot of life and academic skills along the way
TinkerCad: My very first time using a 3D printer, TinkerCad was confusing but I got exactly what I wanted. I went off-script which made my process much harder. Had I followed the prompt, I think I would not have felt so frustrated. TinkerCad is a neat way for students ~and teachers~ to learn how to design and produce 3D items and tools
GenAI: GenAI, such as Copilot and ChatGPT, can be used as tools for marking in classrooms, developing rubrics, and as a resource to find more resources (think artificial librarian). These AI’s can supplement students’ learning while they become educated on when they should and should not use these tools
Apps for Learning: During this week’s class we learned about how many apps there are (and many more to be discovered!) that can inspire learning and exploration for students and aid in demonstrations for teaching
Visual Schedules: As a part of classroom management that we learned from the guest speaker, Brittany Johnson, how helpful visual schedules are for all students, especially those who are on the Autism Spectrum
Closed Captioning: This is only one aspect of making media and technology for inclusive for people with diverse abilities. Another way is writing alternative descriptions for pictures for people who may be visually-impaired and changing the background text colour to be easier to read and register
Overall, my main takeaway from this course and Rich’s rich (haha!) teaching style, was how he made every new part of learning feel approachable. I used to fear having to teach Applied Design, Skills, and Technologies (ADST) in school because I knew little to nothing about it. I was just hoping maybe it would fall off from the curriculum by the time I became a teacher. After having taken the Technology and Innovation course, I feel so much more equipped to get my students excited about learning new and helpful aspects of technology and AI!
After a conversation with Sound Advice Ltd. to gain some insight about how much this project could run me in terms of expenses if the installation goes sideways, I discovered it could cost far more than previously expected.
I asked how much for installing a new stereo into my stock system would cost if I had bought the digital media player on my own and brought it in to be installed. They quoted me about $1000 because they will likely have to calibrate the new technology to be cohesive with the existing system.
I then asked them how much it would be if I started the installation on my own, then was met with a challenge and needed to bring the car in to be corrected. They thought about it and said, “hmm, about $1000.00.”
In all honesty, I was very excited about this project, and I’m feeling like I am at a crossroads. I can either spend the money, and try the installation on my own, which could reward me with a new stereo system and either garner great frustration and a new learned skill… or I can posit that, throughout my research, I have gained the knowledge on how to do a stereo upgrade, what the potential costs and benefits are, and what resources I have access to in the community to make this a reality. Regardless of which path I take, I have learned a lot throughout the process of my inquiry project.
Moving Forward
How can I achieve a more favourable outcome in the future after spending weeks conducting the research to fulfill this inquiry project. Lets take a look at the actions or decisions I can make for the next time to set a more achievable goal:
Gauge the financial stage I am at in life, appropriate to my academic and occupational position. Propose whether I am willing to drop a band on just a new stereo set-up, without the addition of speakers, a subwoofer, and an amplifier
Propose an alternative plan (back-up plan) for when things start to become too expensive or extend beyond my realistic capabilities (this would’ve helped the process feel successful because I would have still met a goal, even if it was Plan B)
Enlist the expertise of someone who has made a similar or exact upgrade to their stereo system in the same make and model as my vehicle. This would’ve allowed me to gain a better perspective for how the process could alter my existing, and favoured, multi-function steering wheel
Access to disposable funds so that I don’t have to consider how the finances would impact my current position as a student and renter
Photo by Hanne
Final Reflection
This inquiry project was very interesting and had some educational components to it. I learned how to manage and post on a website, how to research for products and processes, like removing the interior panelling of a car door. I do feel a bit disappointed that I won’t be able to install a new stereo system for my vehicle yet, but I do feel accomplished in knowing that when the time is right, I could get it done confidently because I know the steps and where to find more information. Next time I will consider a project that does not require as much of a financial sacrifice, or -ideally- no financial sacrifice. Perhaps I will come into a large sum of money and be able to complete my inquiry project of upgrading my VW’s stereo system.